Craftsman 82140 Owner's Manual
Browse online or download Owner's Manual for Multimeters Craftsman 82140. Craftsman 82140 Owner`s manual [en] User Manual
- Page / 21
- Table of contents
- BOOKMARKS
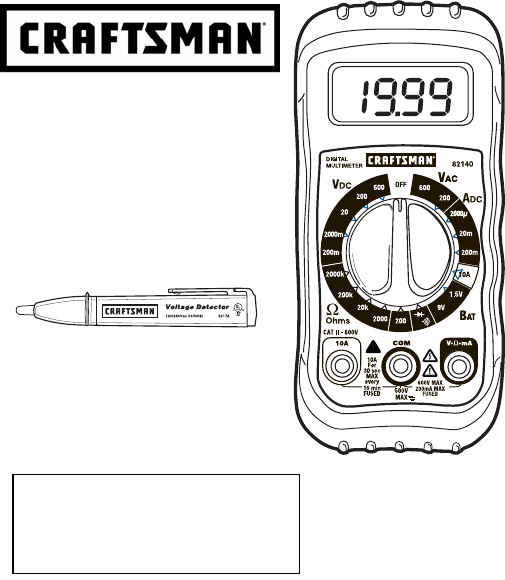
- Digital MultiMeter 1
- Voltage Detector 1
- TABLE OF CONTENTS 2
- ONE YEAR FULL WARRANTY 3
- SAFETY INSTRUCTIONS 4
- SAFETY SYMBOLS 5
- CONTROLS AND JACKS 6
- SYMBOLS AND ANNUNCIATORS 6
- SPECIFICATIONS 7
- BATTERY INSTALLATION 9
- OPERATING INSTRUCTIONS 10
- MAINTENANCE 15
- TROUBLESHOOTING 17
- SERVICE AND PARTS 17
- Owner's Manual 18
Summary of Contents
1 Owner's Manual Digital MultiMeter Model No. 82140 and Voltage Detector Model No. 82174 © Sears, Roebuck and Co., Hoffman
10 OPERATING INSTRUCTIONS WARNING: Risk of electrocution. High-voltage circuits, both AC and DC, are very dangerous and should be measured with great
11 AC VOLTAGE MEASUREMENTS WARNING: Risk of Electrocution. The probe tips may not be long enough to contact the live parts inside some 240V outlets f
12 DC CURRENT MEASUREMENTS CAUTION: Do not make current measurements on the 10A scale for longer than 30 seconds. Exceeding 30 seconds may cause dama
13 RESISTANCE MEASUREMENTS WARNING: To avoid electric shock, disconnect power to the unit under test and discharge all capacitors before taking any re
14 DIODE TEST 1. Insert the black test lead banana plug into the negative COM jack and the red test lead banana plug into the positive diode jack. 2.
15 MAINTENANCE WARNING: To avoid electric shock, disconnect the test leads from any source of voltage before removing the back cover or the battery o
16 REPLACING THE BATTERIES WARNING: To avoid electric shock, disconnect the test leads from any source of voltage before removing the battery door. 1.
17 TROUBLESHOOTING There may be times when your meter does not operate properly. Here are some common problems that you may have and some easy solutio
18 CAUTION: Read, understand and follow Safety Rules and Operating Instructions in this manual before using this product. FIVE YEAR FULL WARRANTY ON C
19 SAFETY SYMBOLS This symbol adjacent to another symbol, terminal or operating device indicates that the operator must refer to an explanation in t
2 TABLE OF CONTENTS Page Warranty 3 Safety Instructions 4 Safety Symbols 5 Control and Jacks 6 Symbols and Annunciators 6 Specifications 7 Bat
20 SPECIFICATIONS Voltage Sensitivity 100 to 240V AC Frequency 50/60Hz Detection distance <0.2” Over voltage Category III 600V Operating
21 OPERATING INSTRUCTIONS AC VOLTAGE DETECTION To check for the presence of AC electrical voltage in an outlet: 1. Touch the probe tip to a cord
3 ONE YEAR FULL WARRANTY ONE YEAR FULL WARRANTY ON CRAFTSMAN MANUAL RANGING MULTIMETER If this CRAFTSMAN Manual Ranging MultiMeter fails to give compl
4 SAFETY INSTRUCTIONS This meter has been designed for safe use, but must be operated with caution. The rules listed below must be carefully followed
5 SAFETY SYMBOLS This symbol adjacent to another symbol, terminal or operating device indicates that the operator must refer to an explanation in the
6 CONTROLS AND JACKS 1. LCD Display 2. Function switch 3. COM jack 4. 10A jack 5. Positive jack Note: Tilt stand, fuse and battery compartment
7 SPECIFICATIONS Function Range Resolution Accuracy 200mV 0.1mV 2000mV 1mV 20V 0.01V 200V 0.1V DC Voltage (V DC) 600V 1V %(0.5% reading + 2 d
8 SPECIFICATIONS Diode Test Test current of 1mA maximum, open circuit voltage 2.8V DC typical Continuity Check Audible signal will sound if the resi
9 BATTERY INSTALLATION WARNING: To avoid electric shock, disconnect the test leads from any source of voltage before removing the battery door. 1. Di
Comments to this Manuals
Related products and manuals for Multimeters Craftsman 82140
 (22 pages)
(26 pages)
(22 pages)
(26 pages)
 (22 pages)
© 2020, manymanuals.com. All rights reserved. | 0.041 s |
 Manymanuals.com
 Manymanuals.de
 Manymanuals.fr
 Manymanuals.it
 Manymanuals.pl
 Manymanuals.cz
 Manymanuals.es
 Manymanuals-pt.com
nice